
In this post you will learn how you can use our 5-step system to maximize bookings from your Airbnb listing.
Although we focus on Airbnb listings in this post, the concepts that we explain can be used to get results on any short-term rental listing site, such as VRBO and Homeaway.
The advice in this post is based on Jasper and Eric’s combined experience of listing on Airbnb and other sites for over 13 years.
We applied the strategy to hundreds of Airbnb listings of our students and we saw consistent improvements in views, requests and bookings.
Nothing is guaranteed in life, but we are extremely confident that if you apply everything we recommend in this post, you will see an increase in bookings.
How to get the most out of this page
This is a long post and skimming over it once will not get you results. Instead, take an hour or so to really dive in and use this page as a resource that you can come back too.
Bookmark it and check back every month or so to see if you missed something. We will update this post frequently as Airbnb constantly modifies its website and search algorithm.
We’ve spent a lot of time putting this guide together (as you’ll see) and we’re offering it to you at no cost.
We only have one ask: please share this post with other hosts. Send it to your friends, post it in FB groups and share it in your communities.
More eyeballs on this post means we’ll get more feedback and data that will allow us to continuously improve and update this resource.
Let’s not just lift our own boat, let’s create a tide that lifts all boats!
Fair enough right? Sweet, now let’s dive in.
The Airbnb Customer Journey
The goal of an Airbnb listing is to get bookings, the more the better. To understand how to optimize a listing to attract bookings, you need to understand how bookings happen.
Before you hear that lovely booking sound, your guest has gone through a process that ended with a click on the book button.
We call this process “the Airbnb customer journey.”
Essentially, two things need to happen in order to get booked:
1. Airbnb has to show your listing to one of its users.
2. That user has to find your listing attractive enough to book it, whether that’s an instant booking or after exchanging a few messages with you.
In order to really understand the process, we’ve split this up further into five stages: impression, view, inquiry, booking and stay.
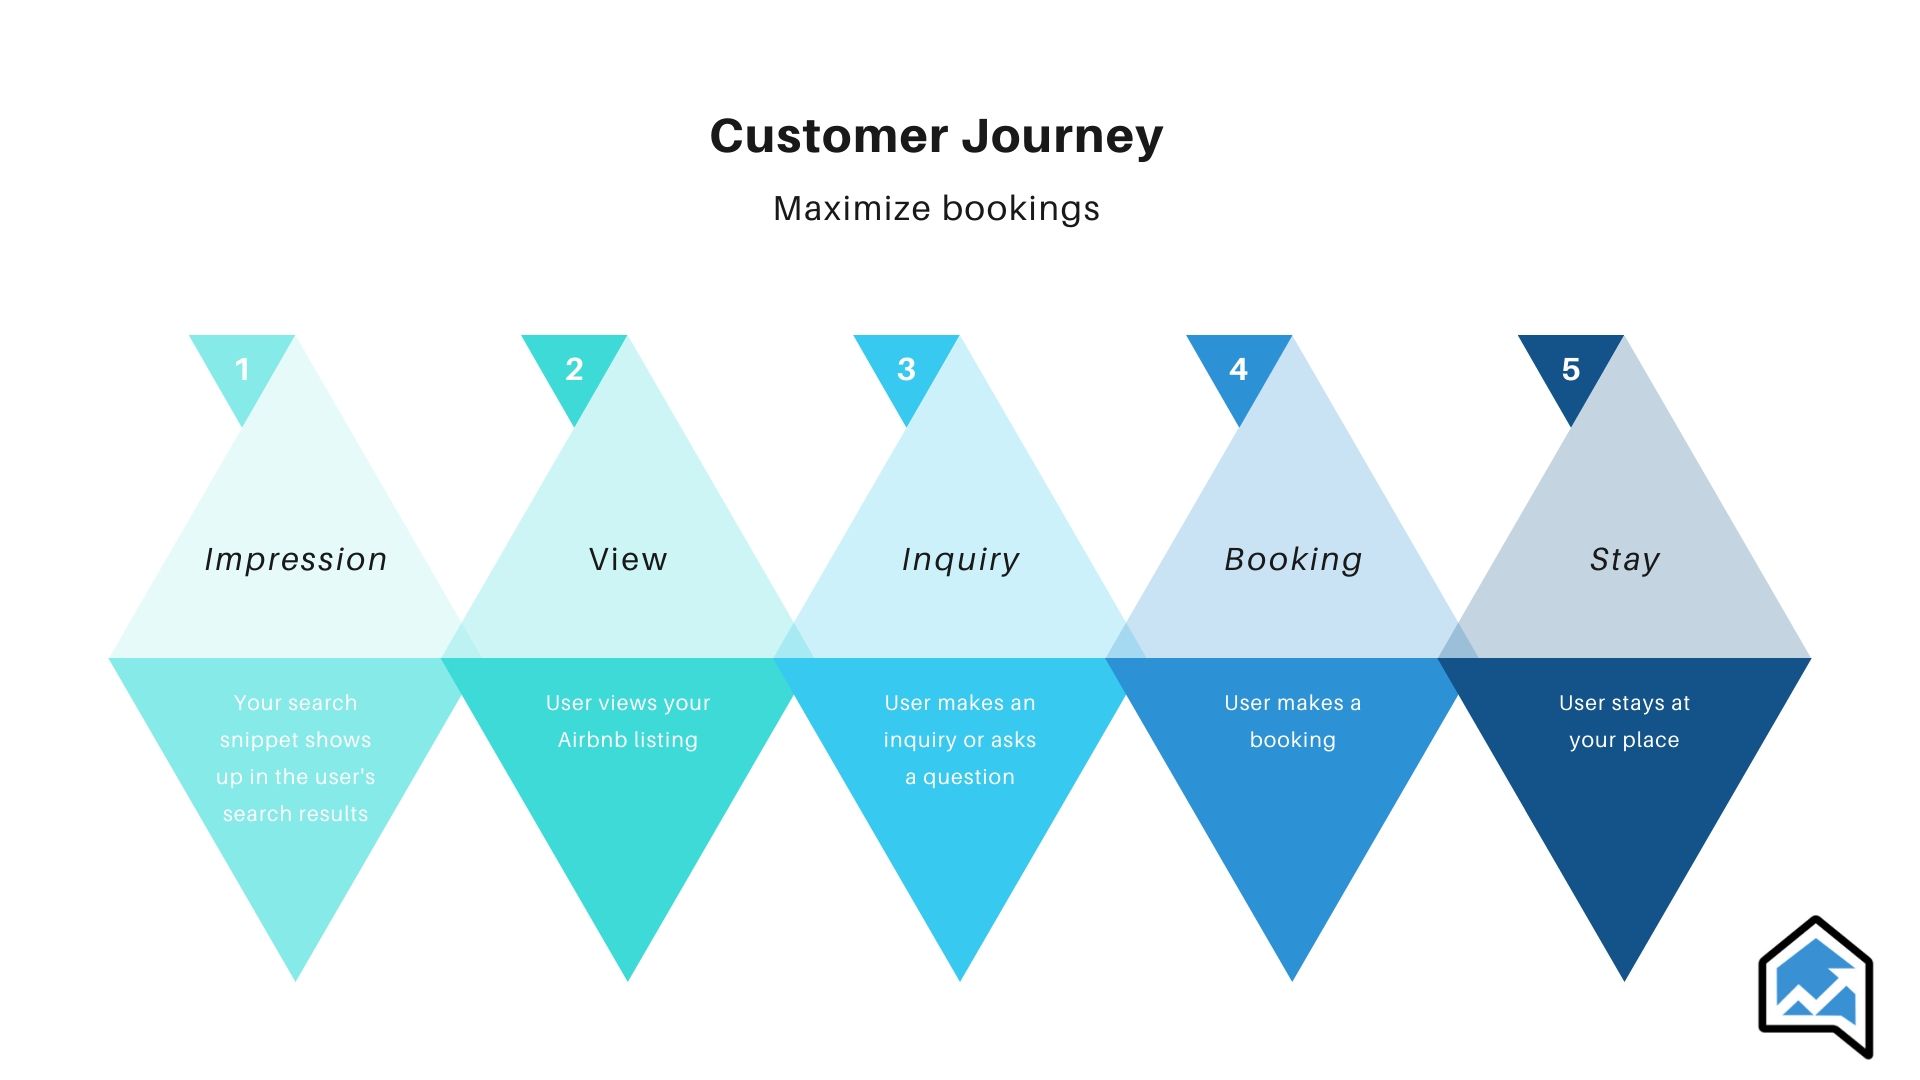
The Airbnb customer journey consists of five phases.
1. Impression
An impression happens when Airbnb shows the search snippet of your listing to a user. The purpose of your search snippet is to grab the viewer’s attention and entice that person to click on it.
2. Views
A view happens when a user clicks on your search snippet and looks at your Airbnb listing. You can see on the Airbnb website how many views your listing gets. The goal is to convert views into inquiries and bookings.
3. Inquiry
When a user requests to book with you or sends you a message, we say that you have received an inquiry. This is essentially a sales lead that you are in direct communication with. Your job is to convert this lead into a booking, if you think the guest is a good fit for your unit.
4. Booking
Hopefully step one to three lead to a booking. But the story doesn’t end here. In order to maximize bookings, we have to understand what the best course of action is once we receive that booking.
The reason is, as you will learn in this post, that your post-booking process influences how often Airbnb will show your listing to its users in the future, i.e. the amount of impressions your listing gets.
5. Stay
Your goal during your guest’s stay is to maximize the guest’s experience. There’s nothing that will help you get more bookings than guests who are raving about your place.
Step 1: Impression
So how do you get Airbnb to show your listing in the search results? That’s the one million dollar question.
Two things need to happen in for Airbnb to show your listing:
1. Your listing needs to match the user’s search criteria.
2. Airbnb’s search algorithm must favour your listing over most other listings.
The first part is fairly easy to optimize. We simply look at the search criteria that Airbnb provides, and then set our listing up so that it matches as many criteria as possible.
The first three criteria that Airbnb asks their users to choose are:
- Location
- Dates
- Number of guests
The location is something we can’t really optimize, unless you rent out a boat or an RV. If you do, you could move it to where ever the demand is.¡
I still have this crazy idea to buy an RV and drive it across the US to park it near big events, such as the Super Bowl and South by South West.
Dates is a different story. Obviously, you can only rent your place to one group of guests at a time. If the dates aren’t available, you won’t show up in the search. But, there are a few booking settings that you can optimize to show up as much as possible.
These settings are under “availability settings” on the Airbnb website.
Here are the optimal settings:
- Minimum night stay: 1
- Advance notice: same day
- Preparation time: none
- Availability window: 12 month (or longer)
These settings may not be realistic for every host. You might feel like a one-night stay isn’t worth the hassle, or you prefer to have at least a few days notice before hosting a guest.
If that’s the case, I would challenge you to ask yourself this question:
What do I need to do in order to be able to use these settings?
You may have to change your turnover process or install a self-checkin option.
The second part is to optimize your listing to maximize its visibility in the Airbnb search results. This is known as “Airbnb SEO.” Just like Google, Airbnb has a search algorithm that calculates a search ranking for every search that’s performed on the Airbnb website.
Your goal is to show up on the first page of those search results as often as possible. There’s no point being on the other pages. People generally scroll through the first page results and make their choice.
Airbnb doesn’t disclose all the ranking factors that it uses to calculate the rankings, but there are a few that they have disclosed.
- The number of reviews
- Number of trips completed
- Number of reviews
- Average guest satisfaction rating
- Response rate
- Response time
- Booking declines
- Instant book
What it comes down to is that you want to make it easy for guests to book your place, respond fast to inquiries and messages, and provide an outstanding guest experience.
The reason why Airbnb values these things is of course because they care most about the experience that its users have on their platform. More users, more profit.
Step 2: View
So, you’ve optimized your listing and Airbnb is showing your search snippet to a lot of potential guests. But that only helps you if people actually click on your snippet and check out your listing.
So the next step is to optimize your search snippet to maximize clicks.
Let’s take a look at what the snippet consists of. Note that your snippet can be displayed in two ways, depending on if the user is using the “map view” to search or not.
Below you can see the two versions for a particular listing.
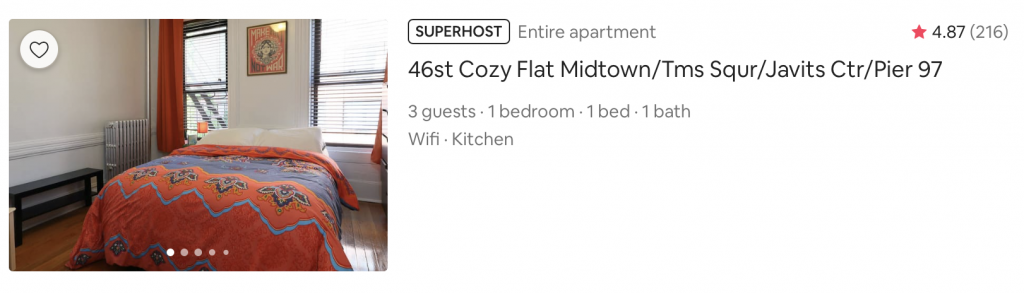
This is the larger version of the search snippet, the one the Airbnb user will see when using the map functionality to search.
It consists of the following elements:
- Your first listing photo (we call this your “featured image”)
- The type of space your rent out
- Your listing title
- The amount of reviews you have
- Your average guest satisfaction rating
- The number of guests you can host
- The number of bedrooms, beds and bathrooms
- A selected number of ammeneties
- The superhost badge (if you’re a superhost)
If the user is not using the map functionality to search for a listing, then the snippet will look like the one below.
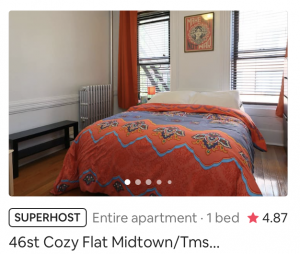
Notice that a few elements are left out in the smaller widget:
- The amenities
- The number of reviews
- The amount of guests
- The number of bed- and bathrooms
Airbnb doesn’t publish data on the percentage of its users using that map functionality, so we don’t know which search snippet will be shown more. But, we should make sure that they both look good.
Now let’s focus on the two major elements of both search snippets that we believe are the most important, and also the ones you can change at any time:
- The featured image
- The title
The featured image is the first photo of your photo gallery. This photo should grab the attention of the viewer and display one of your listing’s most attractive features.
We recommend you do a few searches on Airbnb to find your snippet and look at how it compares to the other snippets in the search view.
If most of your competitors show a photo of a bedroom, you might want to show the entire home or living room.
Also pay attention to colors. If you have a picture that contains a color that really stands out, that could be a good choice. In the example above, notice how the green, blue and yellow stand out.
The most important thing to consider regarding your title is that is should be displayed well in both snippets. In the examples above you can see that some of the titles are cut-off for example.
That’s something you want to avoid, so after you compose your title make sure they make sense in both snippets.
Action time. Do a few searches in your neighborhood to find your search snippet and ask yourself the following questions:
- Does your snippet stand out?
- Is your title displaying correctly?
- Is your featured image attractive?
If the answer to these questions isn’t a resounding YES, then go ahead and make improvements.
If you join the Short-Term Rental Profit Academy now, we’ll get on a 1-on-1 call with you to help you optimize your title and featured image.
How to convert views to inquiries and bookings
An Airbnb user spotting your search snippet and clicking on it is a clear indication that that person is interested in booking your place. But before that happens, your potential guest is most likely going to look at two things:
- Your listing photos
- Your reviews
We cover reviews later in this post, under step 5, Stays.
Let’s start with the photos. No matter how great your place is, if your photos don’t do it justice, you won’t get booked. It’s as simple as that.
Here are four steps to ensure your photo gallery is up to par:
- Make sure the photos are of great quality
- Add enough photos to visualize every aspect of the experience
- Put the photos in order of attractiveness and importance
- Add a descriptive and catchy caption to each photo
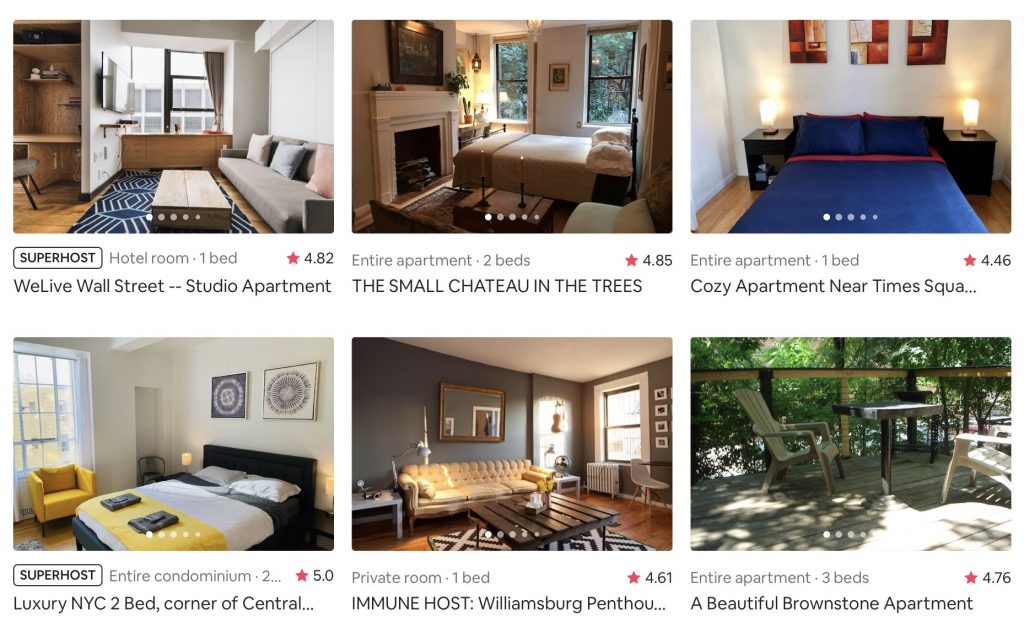
The first five photos are by far the most important. Why? Because they show up on the front page of your Airbnb listing, and are the first ones that will be looked at.
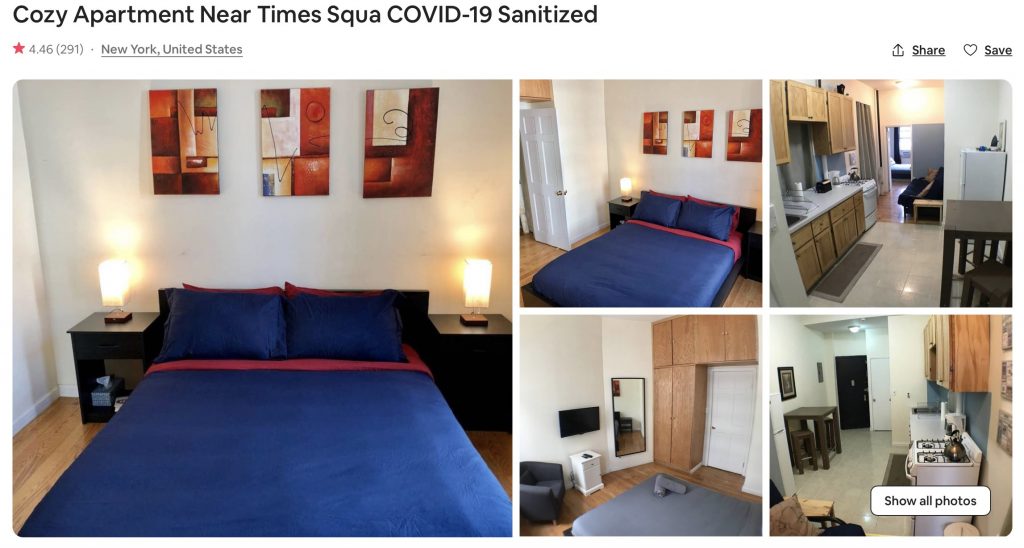
We call the five photos that show up on the front page of your listing the “Airbnb photo collage.”
If these photos don’t look great, you will most likely lose your prospective guest.
Every one of these photos should show something unique and attractive about the experience that you’re offering.
In the example above, what do you think is good and what could be improved?
The first photo is good. It displays one of the bedrooms, most likely the room where the guests will spend most time. A good night of sleep is a crucial part of any trip, so the bed needs to look comfortable, which it does.
The staging in the photo is solid too, there’s no clutter. So far so good.
The other four pictures are not great. The 2nd one shows the same bed, it doesn’t add any new information. Two pictures show the kitchen, but the photos aren’t attractive.
The photo of the other bedrooms displays half a bed. A picture should always fully display its most important object.
Time for action. Go ahead and look at your photo collage and ask yourself these questions:
- Do all the photos in your collage show something unique and attractive?
- Are all the photos of high quality?
- Are the major spaces in your space represented?
- Do all the photos display the main object in full?
If there is a “no” in one of your answers, go ahead and fix it.
Step 3: Inquiry
Guests have two ways to book with you: they can book instantly, if you have instant book turned on, or they can make a booking inquiry.
Guests can also send you a message, typically with a question. We consider that an inquiry as well, it’s a clear indication of interest. Call it a sales lead.
If you get an instant booking, you go right into stage 5. But if you get an inquiry or message, it’s your job to turn that into a booking. And this is where most hosts completely drop the ball.
In any other type of business, sales lead are considered extremely value and most companies pay dozens of dollars for leads. They hire qualified sales people to turn these leads into sales.
As a host, we have to step into that role, and here’s how to do that.
Respond as fast as you can
I can’t empahize this enough. You don’t want to know how many bookings I’ve lost over the years because I was too slow to respond.
Guests usually inquire with multiple hosts, and the one who responds quikest often gets the booking.
The same is true for messages, the faster you respond the better. Make sure to download the Airbnb app on your phone and turn on notifications.
You can’t respond when you’re sleeping of course. But, you can hire a virtual assistant in a different time-zone to be on call when you’re sleeping.
In the Short-Term Rental Profit Academy we have an entire training how to find, hire and train a Virtual Assistant.
Follow-up if the guest goes silent
If your guest stops responding, it doesn’t mean you’ve lost the booking. They may have gotten distracted and a simple follow-up could land you the booking.
Just send them a friendly reminder, something along the lines of “Hey, just wanted to see if there’s anything I can help with or if you have any questions.” It only takes a few minutes, so there’s no downside in doing this.
Step 4: Booking
Once you have received a booking, it’s time for fulfilment. The booking phase covers the moment you receive the booking until the guest checks in.
This phase is often overlooked by hosts. I’ve stayed at many Airbnbs where there was complete silence between the moment I booked and my arrival.
This led to a subpar experience. I wasn’t even 100% if the host was going to let me into the apartment.
The booking phase is all about communication. You need to make sure that your guests feel comfortable traveling to your location, knowing that you will do whatever you can to ensure a great stay.
How do you do this?
By communicating with your guests. Ask them if they need any assistance with their travel. Let them know that you’re going to take care of them, that you’re available in case there are any issues.
Provide them with clear arrival instructions. Assume they don’t know anything, that they haven’t read your description (which is probably accurate.)
Step 5: Stay
From a business perspective, the goal of this phase is to get a 5-star review from your guest. As we mentioned before, reviews are essential to the success of your hosting business.
A handful of past guests raving about their stay will go a long way to securing your next booking.
So let’s dive in and find out how to get 5-star reviews.
How to get outstanding reviews
Reviews and ratings are created by your guests, so you can’t directly control them. But, you do have influence of course.
The best way to do this is to deliver an outstanding guest experience. If your guests loved their stay, they will happily rate you 5-stars and write up a glaring review.
So how can you create an amazing experience for your guests?
First of all, you need to have your bases covered:
- An immaculately clean space
- A smooth check-in process
- Swift and accurate communication pre- and during the stay
- Everything that you provide should be working and in good condition
But, it doesn’t stop there. You want to exceed your guest’s expectation.
You can do this by providing a customized welcome gift or an unexpected gesture, like a free airport pick-up.
This is particularly important for new listings. You should really go above and beyond to ensure your first group of guests are blown away by your hospitality.
Respond to reviews
A lot of hosts overlook the importance of responding to reviews. They figure since the guest is gone already, what’s the point?
Well the point is that you’re note responding to your past guests, you’re responding to your future guests.
The purpose of your responses are to shape a favorable image of you as a host in the mind of your future guests. Remember, people buy from people, so how they feel about you as a person is important.
Your review section is one of two places every single one of your prospects is going to look at. It’s prime real estate where you can communicate to your potential customers, and you should use that space.
To positive reviews you can respond with a simple “Thank you for your stay, look forward to hosting you again on the future!”
If there’s any criticism in the review, you have to focus on what you’re going to do to improve. In any case, do not get defensive and don’t argue with your guests. You can win the battle, but you’ll lose the war.
Summary
Alright, that’s it for now. If you’ve made it until here, good job. If you implement all the steps, you will 100% get more bookings.
Now you have two options.
Option 1 is to do this on your own. Take this info, put it into action, and surely you will see some results.
Or, option 2, we do this together. You join the Short-Term Rental Profit Academy and we will guide you along the way to make sure you get the best results.